Sunday, December 08, 2013

Replacing a 1983 Porsche 944 alternator

My son owns a Porsche 944 he bought from a guy in Pekin.  I thought he was nuts as it is quite old (and I like newer cars...) and I thought we would be fixing it all the time.  Well, two years later we are doing our first repair.

He has been driving to school and back and has, as I recall now, complained of dim headlights.  He also has to recharge the battery every few weeks.  For some reason this did not register until last week. "You need a new alternator" I said.  "No, I don't think so," he said.  A week later he agreed and we went to work.

I found a few pictures on the web but no step by step instructions.  This is a pretty easy repair, but for folks who like pictures, here you go. (oh, and the rebuilt alternator cost $113.00.)

First, putting it up on jack stands is a must because you have to get under the car to loosen the bottom bolt on the alternator.  Some confusion exists on the web concerning the proper placement of the jack stands.  We put them at the front of the frame rails and they see to hold well.  The 944 actually has you lift the entire side of the car and while that is great for changing a tire, it is not so great for jack stands.  Check out the web for ideas on placement.  We took off the skid plate.


Underneath the skid plate was a clean engine (yes!).  We saw no leaks and just a bit of oil under the oil filter.  This past summer we changed the oil without removing the skid plate.  It is possible but from now on we will probably do it.  The jack stands are brand new from Advance Auto Parts ($25).

Ok, so the second step was to take off the air filter box.  You have to unscrew the top of it and then, to remove the box, you have to unbolt it.  Unfortunately the bolts were all stripped on the inside (poor design) so we disconnected the entire bracket on the front.


At the left side of the picture below you can barely see some circles.  These are the bolts that we took out to get the front off.  


The back came off pretty easily.  There was a hose that is connected to the bracket but that came off easily.  After we peeled that back we got a look at the alternator.


This is the final picture of the air box removed.   We just bent it back and laid it on the engine.  There is a cable connecting the air flow meter to the electrical system.  Instead of fiddling with it, it is easier just to leave it connected.  It is not in the way.


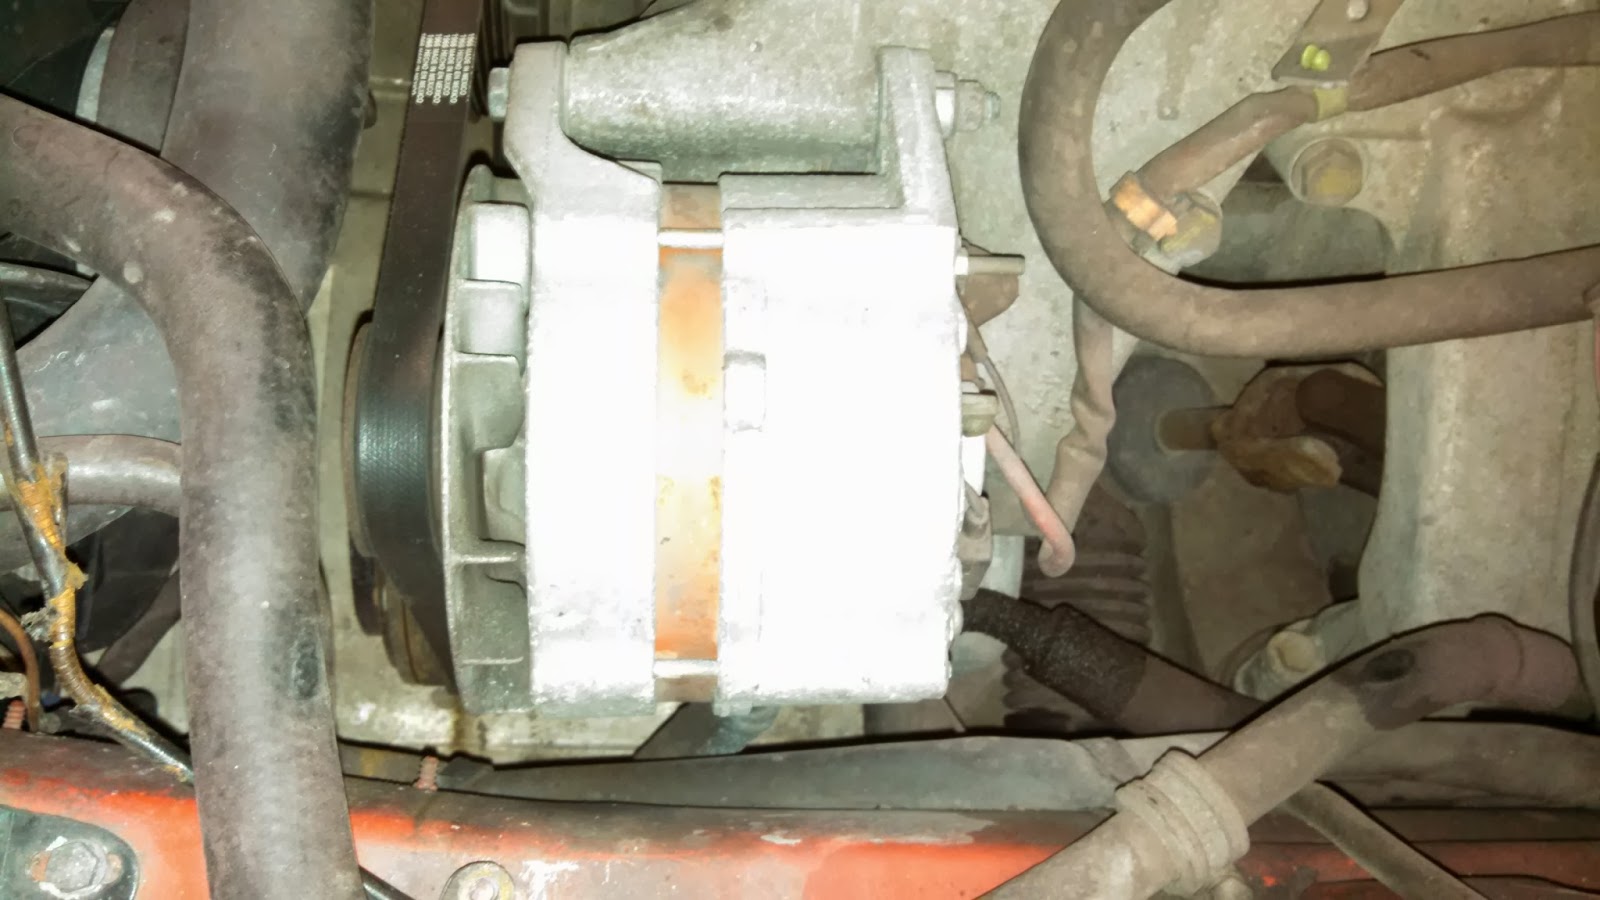
Below is the first look at the alternator. The first thing you have to do is to remove the belt.  There is a horizontal belt tensioner that you need to loosen.  There are 2 hex nuts on each end.  Loosen the outside ones and then keep twisting the middle.  The belt will loosen and you can take it off.  


In order to get the alternator off, there are two bolts that need to be removed.  The top one is easy but the bottom one is the hardest thing in this job.  The air conditioning compressor is in the way and need to loosened so it can be swung out of the way.  If you have some cool tools you could probably get it done without doing this, but if you have sockets and straight things, you will have to remove the belt tensioner, swing it away, and then loosen the bolts holding the compressor.  This is all not that bad and makes easier (not easiest) access to the bolt.


After this is done, the bottom bolt is accessible and the alternator comes out.  One more problem (for us).  The new alternator does not have a pulley on it so it must be removed from the old one.  Rats!  I will have to take it to a mechanic as we could not get it off.


So, the entire removal took 1.5 hours. and was a great time with my son.  Tomorrow I will get the pulley removed and we will put it all back together.


Saturday, February 02, 2013

Say Goodby to an iDrive...

So how many of you got suckered in to an iDrive?  We built a house about 5 years ago and the builder asked if we wanted the latest garage door opener.  Who wouldn't?  iDrives have been so successful, they are not made by Wayne Dalton anymore.


Well, one of ours died about 6 months ago and we have spent 5 of those months sending the kids out to open it.  It was actually not that bad until it got really cold.  When the car door opened it got a bit chilly in the car and that was no good.  We had the Wayne Dalton guy come out and give us a quote and Wow!   $80 for the quote, $355 to fix it!  Ouch!  So I decided to take matters in my own hands...

Quality was a bit of a disappointment.  The right side lens will not stay shut...

I bought one of these beauties.  This is a Chamberlin Whisperdrive.  $180 at Lowes.  Lowes has a more stripped down model than anyone else and is about $20 cheaper.  And it is really quiet.  We have an apartment above our garage, so as not to awaken the girls every morning, this was chosen.   I didn't want to remove the iDrive because it is built in to the spring that counterbalances the door.  The biggest problem is where to position the new top bar that holds the chain.  As you can see below, it can be positioned right above the iDrive.


The only modification I had to make was removing the paddle thing (actually a security measure) from the bottom of the iDrive.  It comes off easily with a screwdriver.


My dad and I put up the new opener in about 2 hours.  It was very easy.  I suggest not fixing the iDrive.  They are nice, but a good replacement opener is way cheaper.


Monday, December 31, 2012

Convert a Ceiling fan to LED lighting...

Most ceiling fans come with candelabra bulb sockets.  These sockets make it very difficult to use LED bulbs because as of 12/2012 I can't find a good candelabra LED bulb.  There is a reason for companies to ship ceiling fans with candelabra bulb sockets:  US regulations.  To make a long story short, in 2005 a regulation was published that forced companies to use them.  That is a simplification of course, but now we are stuck with it.

We built a house in 2005 and I bought three identical ceiling fans for our 3 bedrooms.  Two had candelabra sockets:


And one had standard sockets:


Funny, eh?  I have read that the companies had several years to comply so there was some of the standard socket ones in the sales channel.  Anyway, I want to use these:

That, my friends, is a Philips 60w equivalent bulb...
These babys are sweet and expensive.  I have a daughter that is paying rent and she has been buying them for me!  They are exactly like the normal 60w bulb but they use 12 watts.  Quite a saving but, for this post, they do NOT come in candelabra bulbs.  Hence the change.

Shut off the power before you try any of this!  Remove the screws that hold the light kit and you get this:


There is a black and white wire that connects the lights to the fan.  Those go down through the base of the light (they are sticking out the the left above).  Disconnect or cut them.  They usually have connectors because you can change light kits.   You need to remove the candelabra light fixture. It is the center picture below.  They unscrew pretty easily (usually).


The replacement is the top fixture above.  I bought it on the web, but found it at a local store a week later.  It sports two standard size sockets but is noticeably shorter.  We will need to add some length to the hollow screw at the bottom.  These hollow screws can be bought from a hardware store or you can cannibalize another light in the house to get one.  There are also connectors to affix two together. You will need to remove the hollow screw from the candelabra base fixture and add it to the standard fixture. Now doing this conversion will remove the switch that is at the bottom of the fan.  I have two switches on my wall:  one for the fan and one for the light.  So I don't need the switch.  YMMV.  Here is my finished fixture:


I removed the hollow screw from the candelabra fixture, connected it to another one of the same length that i had from another lamp, and screwed it all together.  Perfect length.  Screw it into the cover:


and then do the electrical connections:


Always use the correct sized wire nuts for this.  When this is done, reattach the entire fixture and add the bulbs:


Finally add the bottom globe holders and such and you get this:


This light will use 25 watts and give off 1600 lumens.  The old lights were using 120 watts and 1200 lumens.  Pretty good deal.  Now one thing to consider.  These LED lights are expensive so we only put the in one room with a ceiling fan.  My son plays video games in his room so the light is on a significant amount of time.  However,  our bedroom and my daughters are not used much, so we actually put regular 60 watt standard size bulbs in those fans.  They still give off more light than the candelabra bulbs, but use more electricity.  CFLs are slow to light up and my wife does not like them. 

Saturday, August 04, 2012

LED Lighting

We are making an apartment above our garage and I have wanted to fiddle with LED lighting for a while.  I have a friend, Deryl, who used LED strip lights under his cabinets and they look great.  After a few discussions with him, I decided to try it out.  Deryl used 31k lights bought from Amazon and of course, since he is an engineer and I am way smarter then he, I decided to use the 27k lights because they are 400 warmer than Deryls.  However, after putting them all up my wife and best friend's first words were, "Why are they green?"
27k LED lights from Amazon.  Don't get these.
Tip #1.  Use the 31k lights.  I am actually buying some 31k and 50k lights and hoping to give them a try.  More on that later.
This is what comes in the package.  There is a connector at one end (I didn't recognize it) and two bare black/red wires on the other end.  There is also some 3M tape on the bottom of the lights.  I hooked it up right away and they all seemed to work.  I have read places where sometimes some of the lights are out.  Might want to check.

Here is where they are going.  We have some rafters across an open ceiling and I am going to stick the lights on top of the rafters.

So how do we power all this?  Where, this is where Deryl is the expert.  His job has something to do with extra PC power supplies, so he gave me the skinny on those.  All computer power supplies have several different voltages and one of them is 12v.  Now these lights use 12v and 2 amps a piece and I am installing 3 sets of them so I need around 6 amps.  I went over to the local junk pc shop (I don't know how they stay in business) and bought a 300w Antec power supply for $10.  The picture below shows all the extra wires cut off.  This power supply has a 17amp 12v rail so I have plenty of power.  I would look around the web to figure out the wiring.  Also, I did not know that you have to jump a wire on the big connector (You can see the paperclip below) to get the power supply to work. This actually caused me $10 to figure out as I went and bought a different power supply to replace this one and they guy filled me in on the missing info.  So now I have an extra power supply and complete information.  Good Trade...


So I climbed the ladder and stuck the lights to the top of the rafters and wired them up. Below is a shot of  wire nuts I used.

 Below is the power supply hooked up.  On this (and maybe all) power supplies, the black and yellow wires are the 12volt ones.  LEDs have a specific +/- so be careful there.  I also used 18 gauge speaker wire for the runs to the lights.  They were short:
Finally, here is the final product.

Final Thoughts.  They look great but are not bright enough. The lights I used were 300 for 16 meters, but you can get 600 for 16 meters.  I however can add another strand of lights which is what I will do.  I think they look great....

Saturday, July 08, 2006

Anchorage and home!

Anchorage was a very nice city to spend a couple of days. The first night in we made it to the Captain Cook (a 5 star hotel) and were very underwhelmed. I thought it would be a great place to end our trip, but the pool was not included in the $220 a night room fee. They wanted $10 a piece for pool priveliges. That would be $100 for two days for the family, about the price of a season pass in Tremont! Well, I went down to the desk and pointed that out nicely, and told them we traveled 5,000 miles to get here by car, and they signed me up for the Captains Club for free! I felt like Mark Scott... Well, the toilet shifted when you sat on it, the bathroom fan was broken, and the TV's were consoles - So we had to watch the "Truman Show" on the laptop. Then when the guys went down to swim, we were told that Mitch and Joshua could not swim because they could only swim at certain times, and this ain't it. So we did not swim in Anchorage (although Cory and Chris go in fine. Go figure...)
Well, the next day we did laundry, and then head out to eat lunch with the Yar's (Scott, Elizabeth, Scotty, Tabitha, and the other one). It was a blast to talk with real Alaskan's. That night we watched the "Truman Show" and went to bed at midnight.
The next morning we layed around on our bed and watched Dirty Harry movies. We tried the swimming thing, but that didn't work, so we took a hike to Flattop Mountain. It was an awesome hike, and we got in way over our heads. At the top of the mountain, it was very rocky and Mark got a big gash on his leg during a landslide. There were people there (Alaskan's probably) with little kids on their shoulders hiking up this thing. I thought I was going to loose one of the boys! Chris and Cory waited about half way up, but me and the boys made it to the top. Then, when we started going down, Mitchell cut himself on a rock and it started bleading like crazy. I ripped some strips of my shirt and made a bandage, and we started our descent. It was quite a site! Mitch had a blood soaked rag on his hand, and we were all filthy. We made it down, however, and have a good memory!

That night we tried to nap, but excitement was pretty high for the plane ride home. We drove to the airport, parked the van and we were off! It was a blast on the plane, as everything Mitch and Joshua saw was new to them. I watched a movie on the first flight, and the kids watched a movie on the second. We met Brian, Adam and Matt at Ohare and had a great talk with them, and then took the Farney van home. The drive home was uneventful. It was good to be home.


Our next vacation...

Monday, July 03, 2006

Denali...

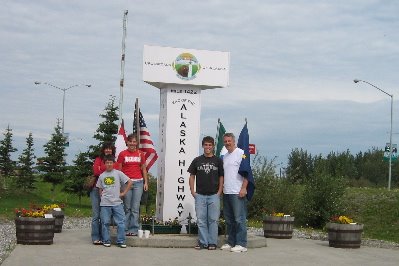
The trip from Tok to Denali was our last big drive. We stopped in Delta Junction to celebrate the end of the Alcan. Available for purchase were certificates for $1 that are signed by the local travel guides saying that you completed the Alcan; an option we turned down.

We spent the afternoon in Fairbanks, but it is a city the size of Pekin, so we just ate lunch there (a great Italian meal) and left. The picture of the fountain is in down town Fairbanks on the riverfront. On to Denali!


The first night in Denali was warm. We have really figured out this tent thing. When we awoke, we took our time getting ready, then went White Water Rafting. Since these are glaciar fed rivers, we had to wear lots of clothing and these "Dry Suits" that really did keep us dry. Since we went to alaska without any coats (doh!) we had to borrow some clothing from the rafting place. The first part of the trip was an easy float trip. I sat next to an 81 year old woman (Angelica) and her grand daughter Zoe. Angelica was born in Germany and was a hoot. She had two replacement hips and was scared to death of any whitewater. On the second half of the trip, sans Angelica and Zoe, we got to do class 3 and 4 rapids. It was really awesome! We have concluded that the Juchems family is not going to waste time on class 1 and 2 anymore. We finished the day with a meal in town and hit the sack. This was the night we were afraid of, since the weather report said it was going to get down to 43. However, when we awoke on Saturday, July 1, were were toasty warm. I did turn Mr. Heater on at about 3am, but I am not sure we needed it.

The top of the "Big Mountain"Denali was awesome, but not quite as awesome as we thought. The top of the mountain was unseen by us. It is never visible from the gate of the park, so you have to take these shuttle busses into the park. Well, we took the "Fish Creek" bus which goes about half way into the park. It was an 8 hour trip but you can get out at any time and just take off walking. Our intention was to get out and hike a bit and then get back on a return bus, but we were afraid we could not get a return bus for a while. So we had an 8 hour bus ride! Chris and I really enjoyed it, but the kids slept most of the way. We saw 8 grizzly bears, two moose, some caribou and a ground squirl (at 5:30) along with some beautiful scenery. The grizzly bear pictures were a little dissapointing because of the distance, but trust us, we saw them. Our bus driver's name was Lee and he was an older guy that had done everything. He gave us a commentary during the trip that was great. When we got to Denali, the clouds were covering it. I did get a picture of the base of the mountain.

This is the base of Denali (I think).

After the big bus ride, we drove to Anchorage (about 4pm) and got to the Captain Cook at about 8:30...

Thursday, June 29, 2006

Whithorse and Tok

We, as always had a great time in Whitehorse. It is a nice town with everything in it. We awoke and discovered that we had nothing planned for the day, so we found a place that had rafting and gold panning. The raft turned out to be a little odd, two canoes put together with some 2x4's, and I was starting to think it was pretty lame, but then they hauled out the gold panning. What a blast. We had so much fun making fun of each other, and we found some gold! Mitch thought he had struck it rich, but it turns out the gold we found was so small as to be worthless. Mitch still thinks he has something, though.
That evening we went to a Salmon and Ribs place. The $200 meal was pretty good. We got buffalo steaks, elk stew and something else (cory). I had my eye on some rubarb pie, but the last piece got snatched up before I could get it. So we had some apple stuff which was OK.

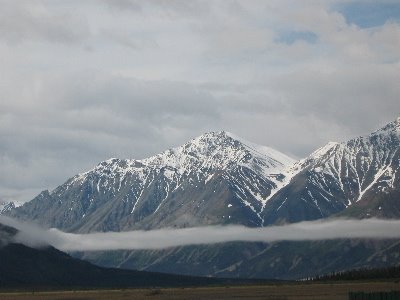
The next day we took off for Tok, Alaska. The books all say this is the most beautiful part of the Alcan, but it was cloudy and rainy all day. In between the clouds we snapped a few pictures. Getting back to the states was great. No more funny money. Tok, even though small, was refreshingly American, and the Sourdough campground was the best so far. The owner, Ken, is a hoot. He runs a little comedy show at night with a pancake toss. If you can through a pancake into a bucket about 10 feet away, you get free breakfast. Mitch won and is now on the Pancake hall of fame! Check it out: Sourdough
.

Monday, June 26, 2006

Watson Lake and Whitehorse

We left Fort Nelson (after a pretty good and warm nite sleep) and headed to Watson Lake. Outside of Fort Nelson we stopped at a little joint on the side of the road that had awesome cinimon rolls. We sat in a little quaint backcountry eatery and had coffee and cinimon rolls that were great. Quite a memory! When we started out, we were discussing how we still hadn't seen a bear or really anything interesting, then it hit. We saw 5 black bears, a few small heards of buffalo, some stone sheep, and a Moose! It was really a great drive. Chris was not afraid of the bears at all, either, which was a surprise.


We have been using a book (Frommers) that has helped us plan our trip. It said that Watson Lake was a dismal place to be avoided. Well, it was the only place to stop, so we went to the "Campground Services" campground there (even the name is unimpressive). Well, the site was OK, but it is the home of the smallest showers on earth, and there were lots of mosquitos. It rained all night, but we stayed dry and warm! Mr. Heater finally helped us out. We covered up the vents in the top of the tent because we thought they were letting all the hot air out. We think we have this cold stuff figured out. We will see in Denali... The signpost forest is in town and is definately the highlight. There are 52,000 signposts pointing to folks houses on posts in the center of town. We did not bring one, but Adam said he was brining one. We didn't get a picture, but there was also some heavy equipment there, and Mitch wanted his picture in some, so that is all the photos we got.

The trip to Whitehorse was short (about 4 hours) and uneventful, except that we stopped at another diner that was run by one lady who did everything. Cory had chili, me and the boys had hamburgers (great), and Chris had broccoli soup. The food was excellent, but Mitchell forgot his retainer there, and we were in Whitehorse before we figured it out. It was an expensive meal.
Our hotel in Whitehorse is pretty nice, and we all took a quick nap when we got there. Oh yea, I threw my back out a few days ago pulling a tent stake out. Josh said that I pulled a "Tim Barrow". I have been hunched over for a few days, but it is much better. I am hoping our two days in Whitehorse will clear it up.

Sunday, June 25, 2006

Grande Prairie and Fort Nelson...


Grande Prairie


Saying goodbye to Banff was tough because we have 3 days of camping, and the Juchems are not campers. Mr. Heater let us down, but after taking a look at the weather report, we discovered that the next two days, at least, are only going to be in the mid 50’s at night. We think we can handle that.

We took off from Banff and drove to Jasper along the Icefields Parkway. It is suppose to be one of the most beautiful drives, and it was! We thought it the best drive we have ever taken (except for maybe Medicine Bow in Wyoming). We stopped first at Lake Moraine, witch is a twin of Lake Louise. It was very nice.

We stopped lots of other places along the way. We saw some great falls and lots of snow. We took the Jasper Tramway up some mountain, and met some folks from Leeds, UK. They were very nice. We spent $115 Canadian for a tram ride, 10 minutes at the top, and a ride down: maybe 30 minutes total. We rolled into one of the nicest campgrounds we have been at - the Tamarack Campground in Grande Prairie. Alas, we were let down once again by Mr. Heater, as we were all cold again.

Fort Nelson...

The drive to Fort Nelson took us through Dawson Creek - Mile marker zero on the Alaskan Highway. The ride was very uneventful. Canada is huge! We have no pictures of our trip because nothing great happened. We knew this would be the booring part of the ride, and it was. We rolled into Fort Nelson at 4pm, ate, and set up camp. For some reason, the campground (Westend) is free. It also has very sad, but clean, bathrooms...